This article will show you how to set up your Wattbike in a couple of easy steps to match your road bike. This will improve comfort, prevent injury and make indoor training more enjoyable. Although I will be referring to the Wattbike throughout it can also be applied to any static bike at home such as Peloton, Kickr bike or Neo bike.
I get asked many times how best to set up your Wattbike at home without any fancy equipment. Now although there is a set-up calculator on the official site many people have had little success with setting it up correctly. With just a few key measurements from your bike, you can simply do it yourself.
What do I need?
You only need a tape measure and a long spirit level.
How to measure your current bike
So the first thing to do is measure your current bike. If you have had a Retul bike fit then you would already have the report which will have this all on it. If not then the important first measurement you need is the saddle height and setback in relation to the centre of the bottom bracket. Second is to measure the handlebar height and reach.
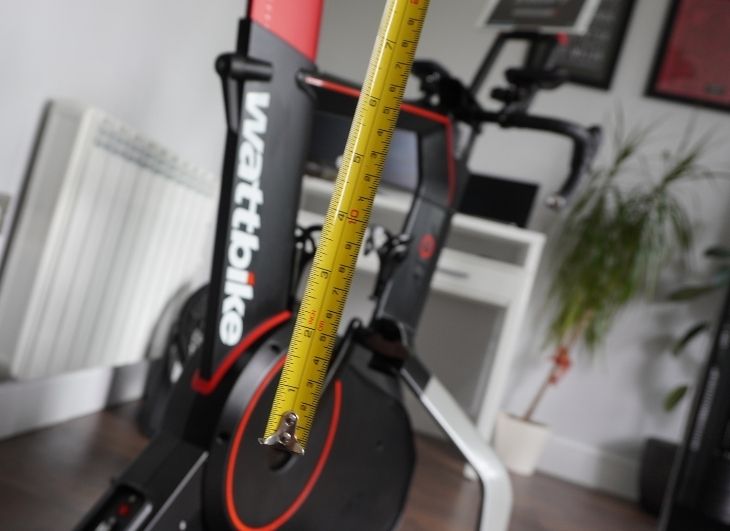
Step 1
Grab your spirit level and place it vertically up from the centre of the bottom bracket and measure back to the tip of the saddle. This would generally be something around 50-100mm.
Step 2
The second task is to find the mid point on the saddle by measuring the length from the nose to the rear. Next grab your tape and measure the height to the centre of the bottom bracket again.
Step 3
Once you have completed the back end of the bike then you just need to do the same with the handlebars. You can measure the height and reach of the centre of the handlebars in relation to the bottom bracket. However I have found this a little tricky to do yourself and can easily get it wrong. What I would suggest that is easier is to simply measure from the tip of the saddle to the centre of the handlebars. Then place your long spirit level on top of the saddle horizontally across to your handlebars and measure the drop to the top of the handlebars.
That’s it! You know have all you need from your current set up.
How to set up your Wattbike
All you need to do now is transfer the measurements that you now have to the Wattbike. Use the same method as above. Be aware that as the saddle goes up it also goes back so you may have to cross reference a couple of times to ensure it is correct.
Important things to note
There are a couple of important things to note when setting up your Wattbike.
- The crank length is 170mm so will need to take this into account and may need to either raise or lower the saddle depending on what you have on your bike. This can be found embosed on the inside of your crank arm
- The saddle length can vary between the Wattbike and your bike. Make sure you deduct/add this onto the saddle setback when transferring between bikes.
- The handlebar width and reach along with the lever length can all vary. Again take this into account with your measurements.
- Make sure the saddle is either level or nose down very slightly.
Summery and final thoughts
I hope this has helped you set up your Wattbike at home. The important thing to get correct is the saddle height and set back. During the winter you can afford to have the front end a little higher for some more comfort. As you get closer to the season then you want to match the reach/drop of your road bike.
Not purchased your indoor bike yet? Then check out my guide of which one to buy here
If you have any comments or questions then drop them in below. This will not only help you but others also.


